Roll Your Own Analytics With Astro, Vercel Edge Functions and Neon
In this post, I’ll explain how you can “roll your own” version of Google Analytics using Astro, Vercel Edge Functions and Neon.

I’ve prepared a sample repository showing the implementation for a site built using Astro and deployed to Vercel.
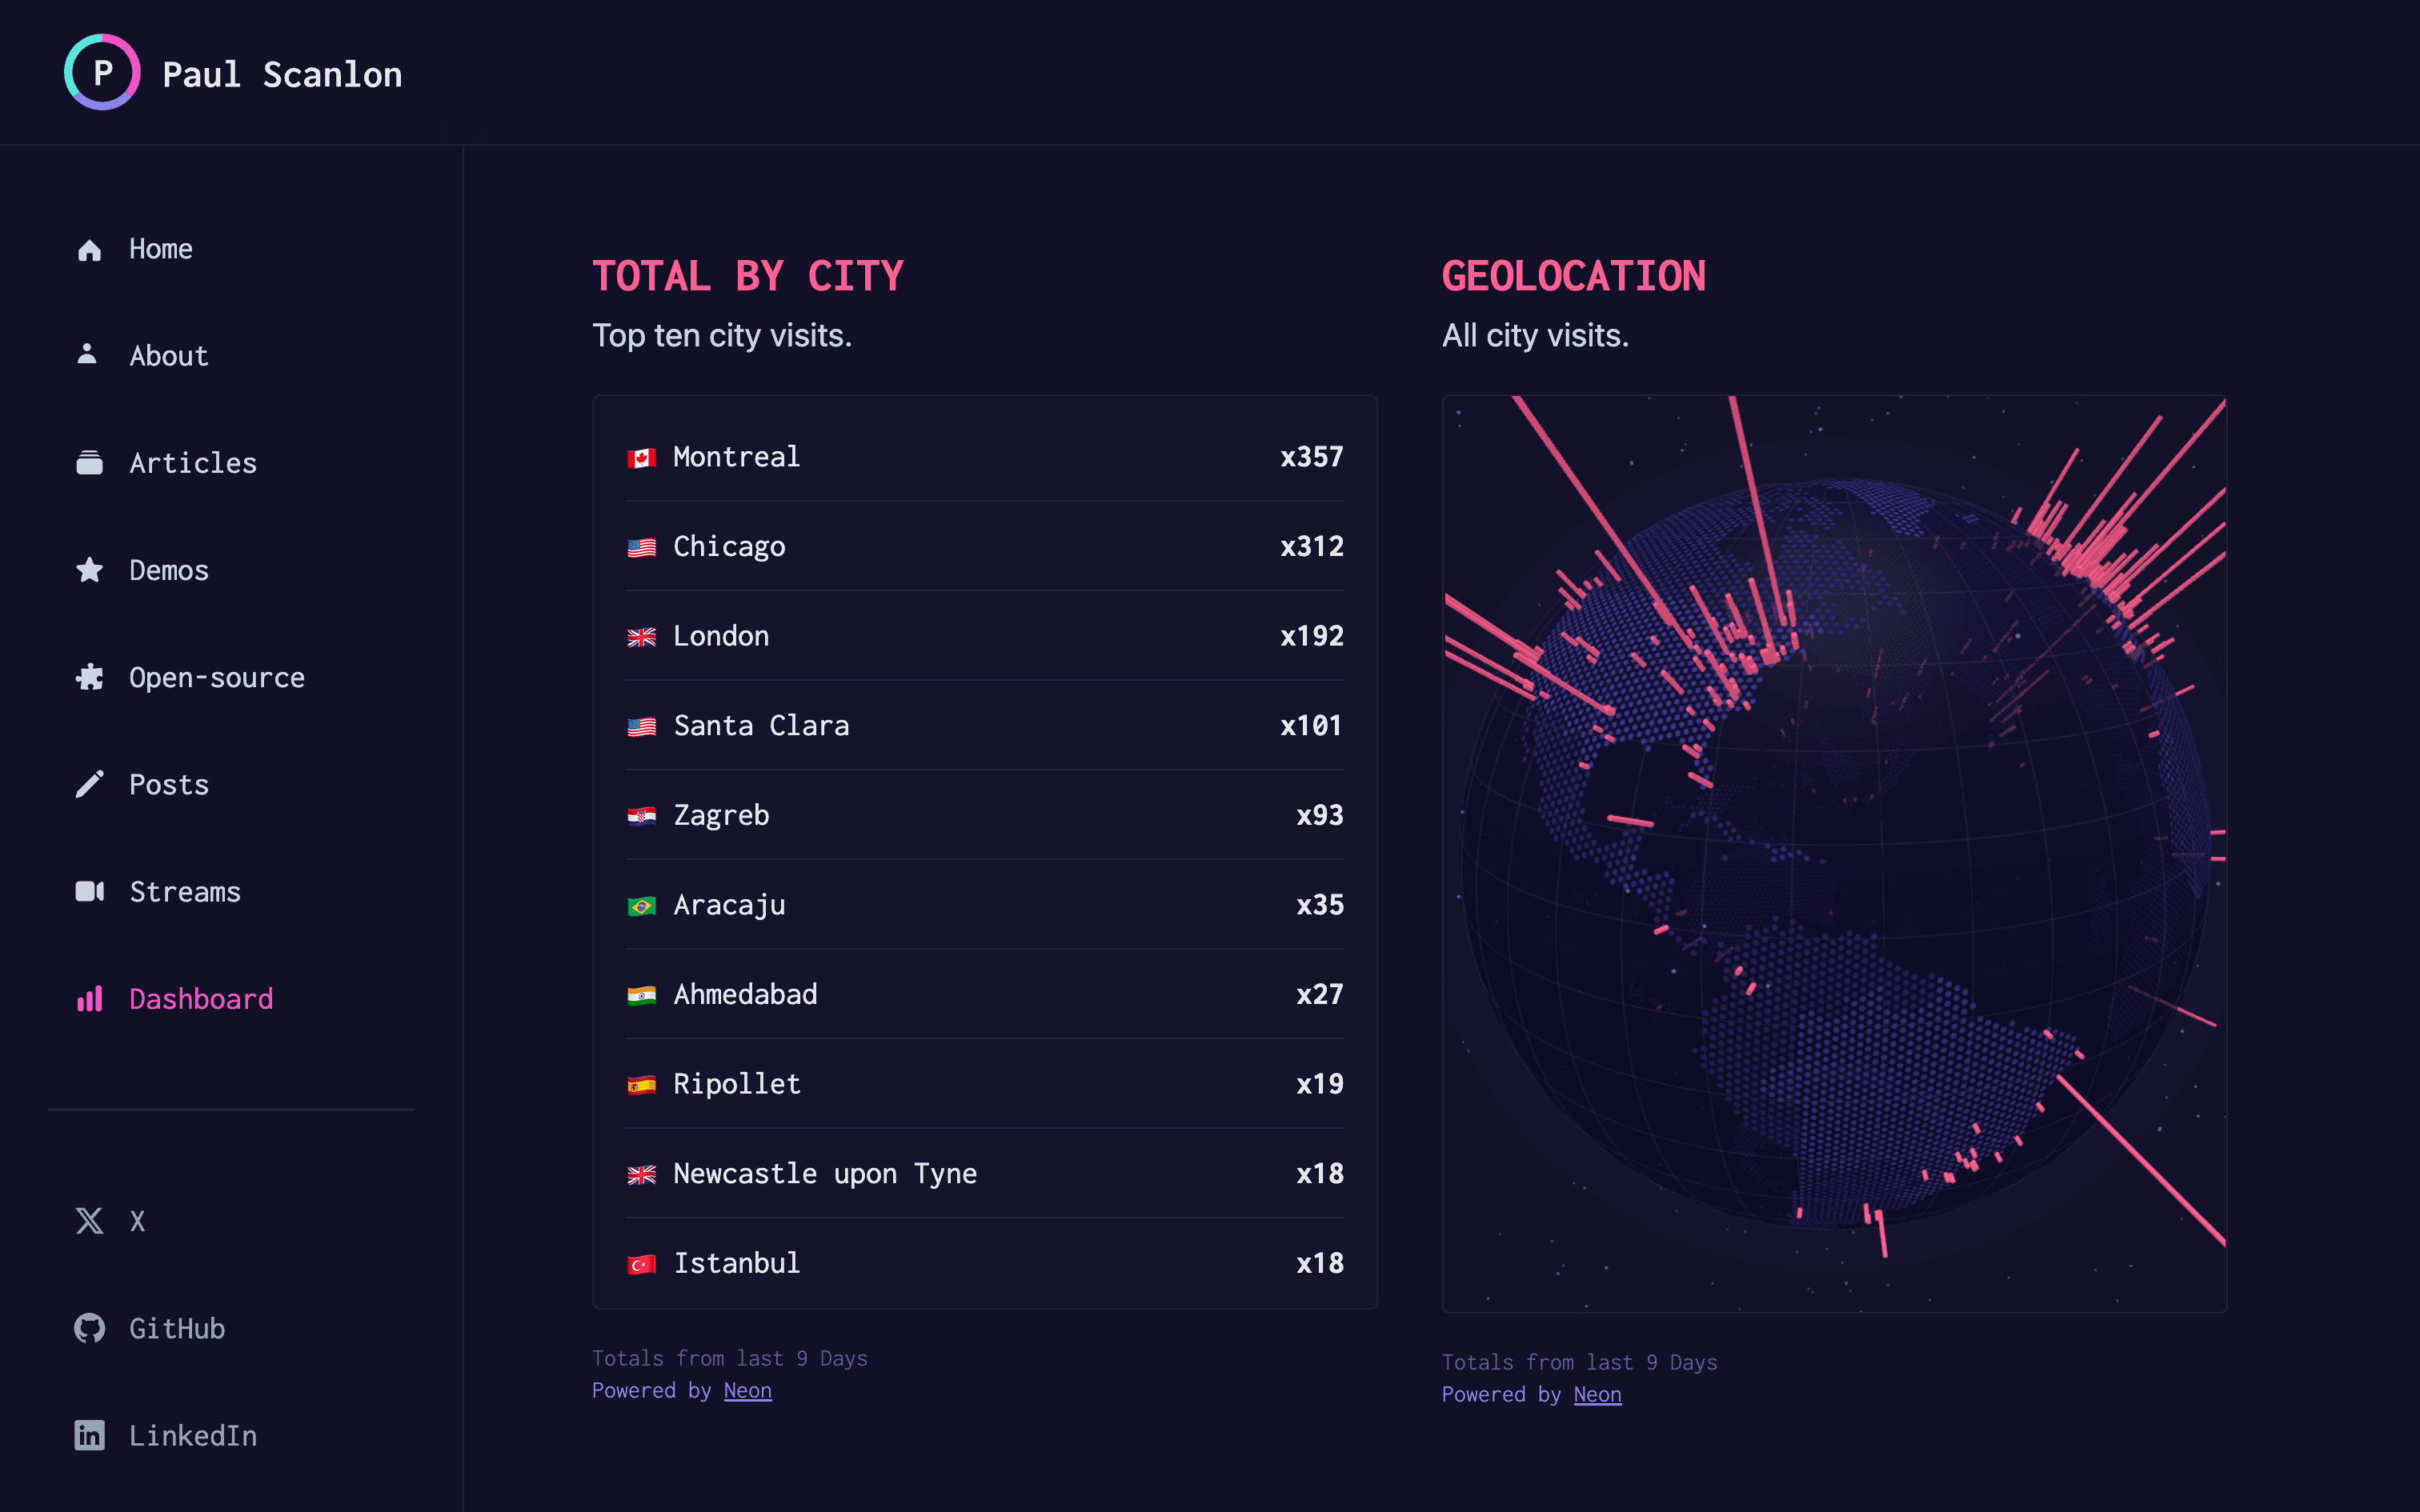
I’ve used this same approach for my own site, paulie.dev, and I’ll explain how I’ve used the data to create the visualisations on my dashboard.
For good measure, I’ve also created a Next.js sample repository, but I won’t be covering that in this post.
The Google Analytics API
You might be wondering, why not just use the Google Analytics API?
For quite a while, that was my approach, but as you probably know, Google retired Universal Analytics in June 2023. I’d been running GA4 in my site since they announced their plans last year so I had data from both, but there’s a problem.
Geolocation coordinates
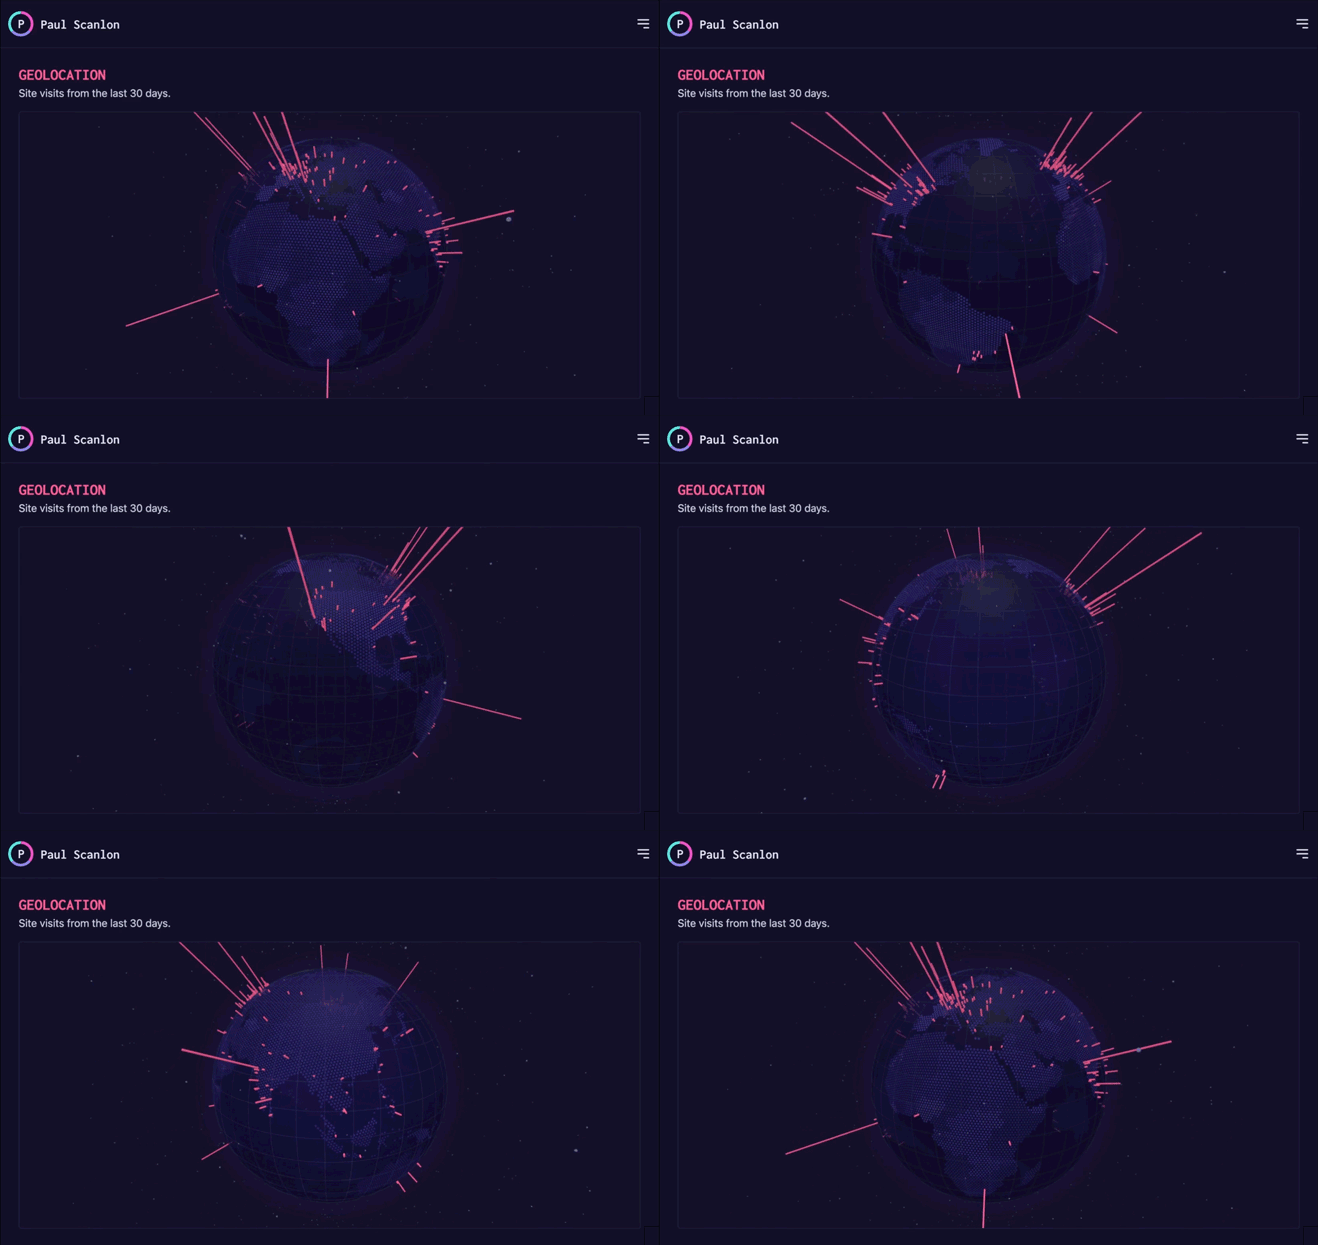
On my dashboard I have a 3D globe which I use to plot the geographic locations of visitors to my site. In Universal Analytics this was no problem, I could query the API which contained a reporting dimension for the latitude and longitude. In GA4 however, Google have removed this dimension which meant, unless I came up with a solution, I’d have to lose the 3D globe!
The Anatomy of Edge Analytics
This was the solution I came up with and there are three main parts to building your own analytics. They are as follows.
- A Neon serverless Postgres database to store the data.
- An Edge Function capable of extracting geolocation data from incoming requests.
- A client-side request to the Edge Function that fires on page load.
This solution isn’t intended to replace Google Analytics but, it is a nice way to capture site visits and visualise activity on my site.
Create a Neon serverless Postgres database
To get started, sign up to Neon, then follow our Create your first project guide. You might also like to look at this guide from our docs: Query with Neon’s SQL Editor.
Once you have a database set up, save the connection string to your .env file and name it, DATABASE_URL.
E.g
DATABASE_URL=postgres://paul:123@a-b-c-123.us-east-1.aws.neon.tech/neondbCreate a table for the data
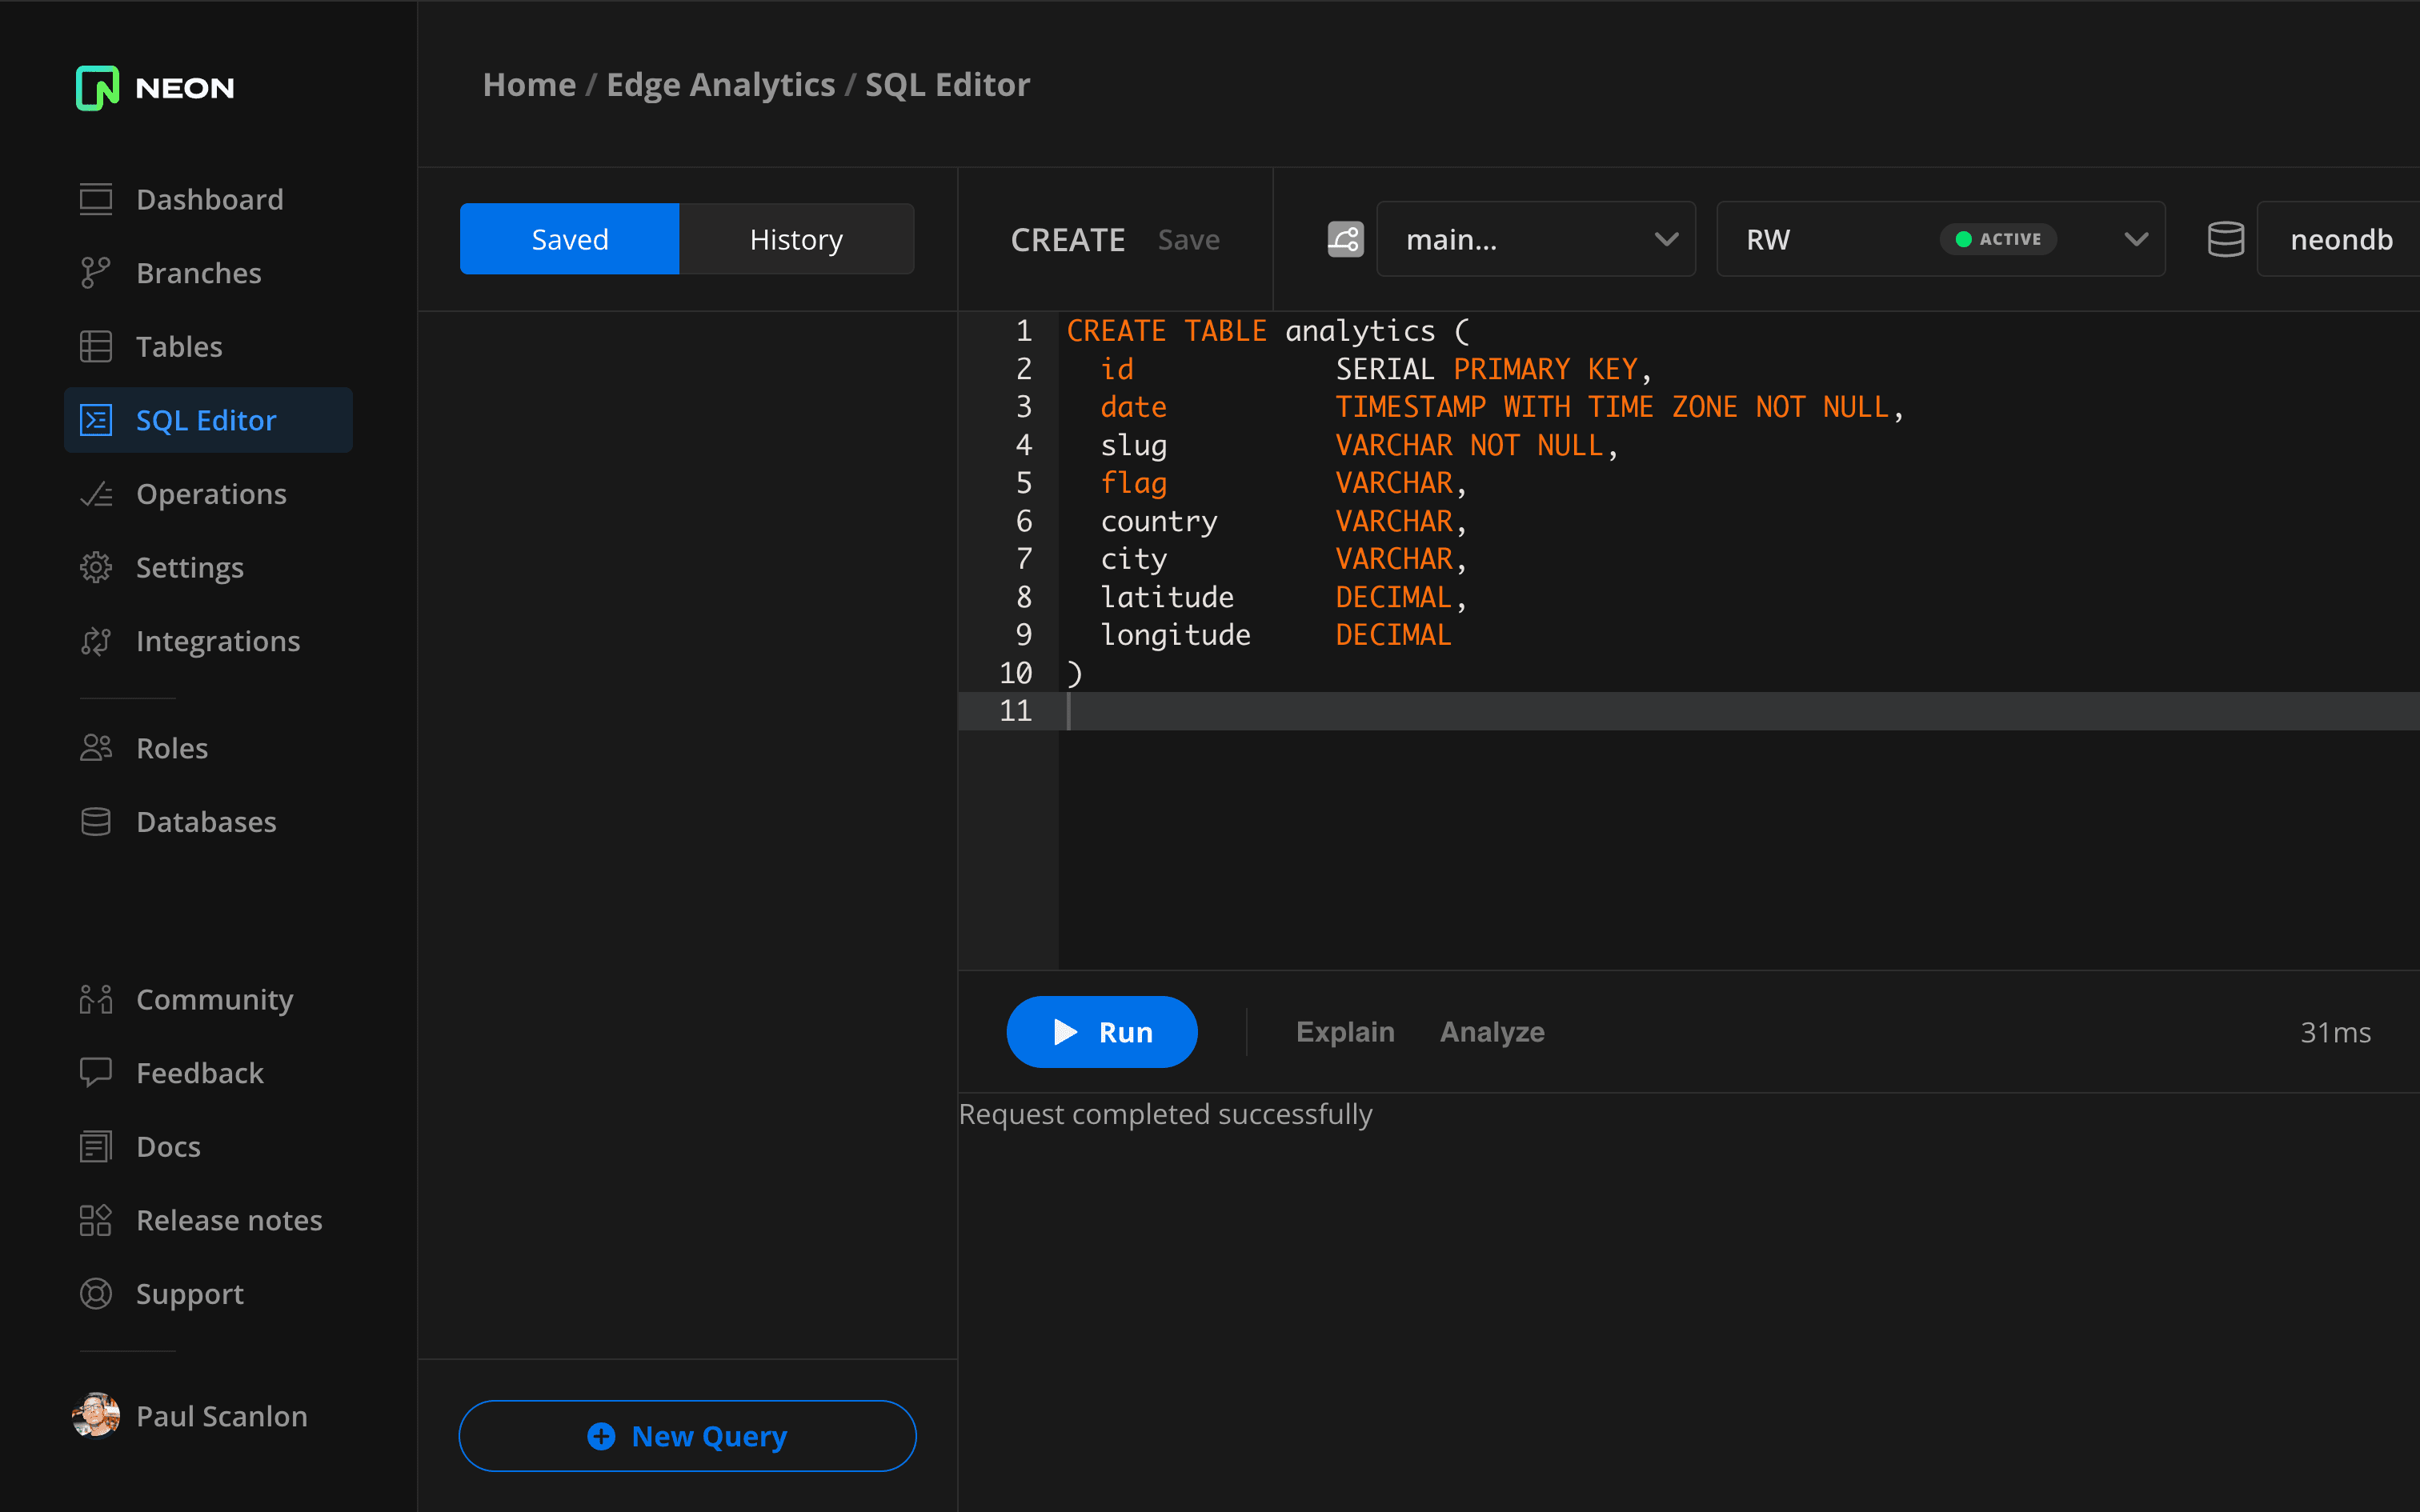
With your database created, head over to the SQL Editor in the Neon console and use the following schema to create a new table called analytics.
CREATE TABLE analytics (
  id            SERIAL PRIMARY KEY,
  date          TIMESTAMP WITH TIME ZONE NOT NULL,
  slug          VARCHAR NOT NULL,
  flag          VARCHAR,
  country       VARCHAR,
  city          VARCHAR,
  latitude      DECIMAL,
  longitude     DECIMAL
)
Install dependencies
There are three dependencies required. The first is the Neon serverless driver, the second is the Astro Vercel adapter, and the third is the @vercel/edge package including a geolocation helper function that can extract geographical information from incoming requests.
npm install @neondatabase/serverless @astrojs/vercel @vercel/edgeConfigure the Astro Vercel Adapter
Locate your astro.config.mjs and add the following config.
import { defineConfig } from 'astro/config';

import vercel from '@astrojs/vercel/serverless';

export default defineConfig({
  ...
  adapter: vercel({
    edgeMiddleware: true,
  }),
});
Create an Edge Function
With the Vercel Adapter set up you can now create a new API route under src/pages/api. In the sample repository, I’ve named the route page-view.js.
import { neon } from '@neondatabase/serverless';
import { geolocation } from '@vercel/edge';

const sql = neon(import.meta.env.DATABASE_URL);

export async function POST({ params, request }) {
  const date = new Date();
  const { slug } = await new Response(request.body).json();

  const { flag, country, city, latitude, longitude } = geolocation(request);

  if (!(flag && country && city && latitude && longitude && slug)) {
    return Response.json({ message: 'Missing required parameters' });
  } else {
    await sql(
      'INSERT INTO analytics(date, slug, flag, country, city, latitude, longitude) VALUES($1, $2, $3, $4, $5, $6, $7)',
      [date, slug, flag, country, city.replace(/[^a-zA-Z ]/g, ' '), latitude, longitude]
    );

    return Response.json({ message: 'A Ok!' });
  }
}

export const config = {
  runtime: 'edge',
};
The Edge Function explained
The Edge Function destructures a slug from the request.body, this is sent from the client (I’ll cover that in a later step). The Edge Function also creates a new date when a request is received, this date will be accurate to the user’s timezone since Edge Functions execute in the same timezone as the user.
I then extract the following values from the request using the geolocation helper function.
- flag
- country
- city
- latitude
- longitude
If any of the above values are null, or a slug hasn’t been passed to the Edge Function, I return a message.
If all values are present and correct I proceed to INSERT INTO the database.
It’s worth noting that all geolocation values will be null while running the development server. You’ll have to deploy to Vercel to see any values from incoming requests.
That completes the database and server-side part of this post. It’s now time to move on to the front end.
Create an EdgeAnalytics component
With the Edge Function in place, it’s now ready to receive client-side requests. Unconventionally, rather than using fetch, I’ll be using sendBeacon. (Thanks to Ward Peeters for the suggestion).
As Ward mentions in our conversation, using fetch won’t necessarily harm performance, but sendBeacon is pretty much specifically for use with requests of this nature, and to quote from the MDN docs verbatim.
It’s intended to be used for sending analytics data to a web server, and avoids some of the problems with legacy techniques for sending analytics, such as the use of XMLHttpRequest.
https://developer.mozilla.org/en-US/docs/Web/API/Navigator/sendBeacon
It’s worth noting though, some Ad Blockers might block requests made using sendBeacon.
EdgeAnalytics component
Create a new component in src/components. In the sample repository, I’ve named the component edge-analytics.astro.
---
const { slug } = Astro.props;
---

<edge-analytics data-slug={slug}></edge-analytics>
<script>
  class EdgeAnalytics extends HTMLElement {
    constructor() {
      super();
      (() => {
        navigator.sendBeacon('/api/page-view', JSON.stringify({ slug: this.dataset.slug }));
      })();
    }
  }
  customElements.define('edge-analytics', EdgeAnalytics);
</script>
The EdgeAnalytics component explained
The EdgeAnalytics component is a web component with custom elements and contains a self-invoking function that uses sendBeacon to POST a slug to the Edge Function. The slug will be passed as a prop, which I’ll cover in the implementation steps next.
Implement the EdgeAnalytics component
Add the EdgeAnalytics component to each page where you’d like to track page views. You can see how I’ve implemented the component in the sample repository here: index.astro.
---
import EdgeAnalytics from '../components/edge-analytics.astro';

const isProduction = import.meta.env.PROD;
---

<html lang='en'>
  <head>
    <meta charset='utf-8' />
    <!-- Edge Analytics -->
    {isProduction ? <EdgeAnalytics slug='/' /> : null}
  </head>
  <body>
    <main>
      <h1>Index</h1>
    </main>
  </body>
</html>
EdgeAnalytics component implementation explained
To prevent page views from being fired off while in development, I’m conditionally rendering the component using a ternary operator and an isProduction const. Only when the environment variable, isProduction, is true will the component be rendered to a page.
Finally, as I mentioned, the component accepts a prop called slug which is where I pass in the current page URL.
Deploy
That completes the front-end part of this post, but to see if everything is working as expected you’ll need to deploy your site and visit a few of the pages.
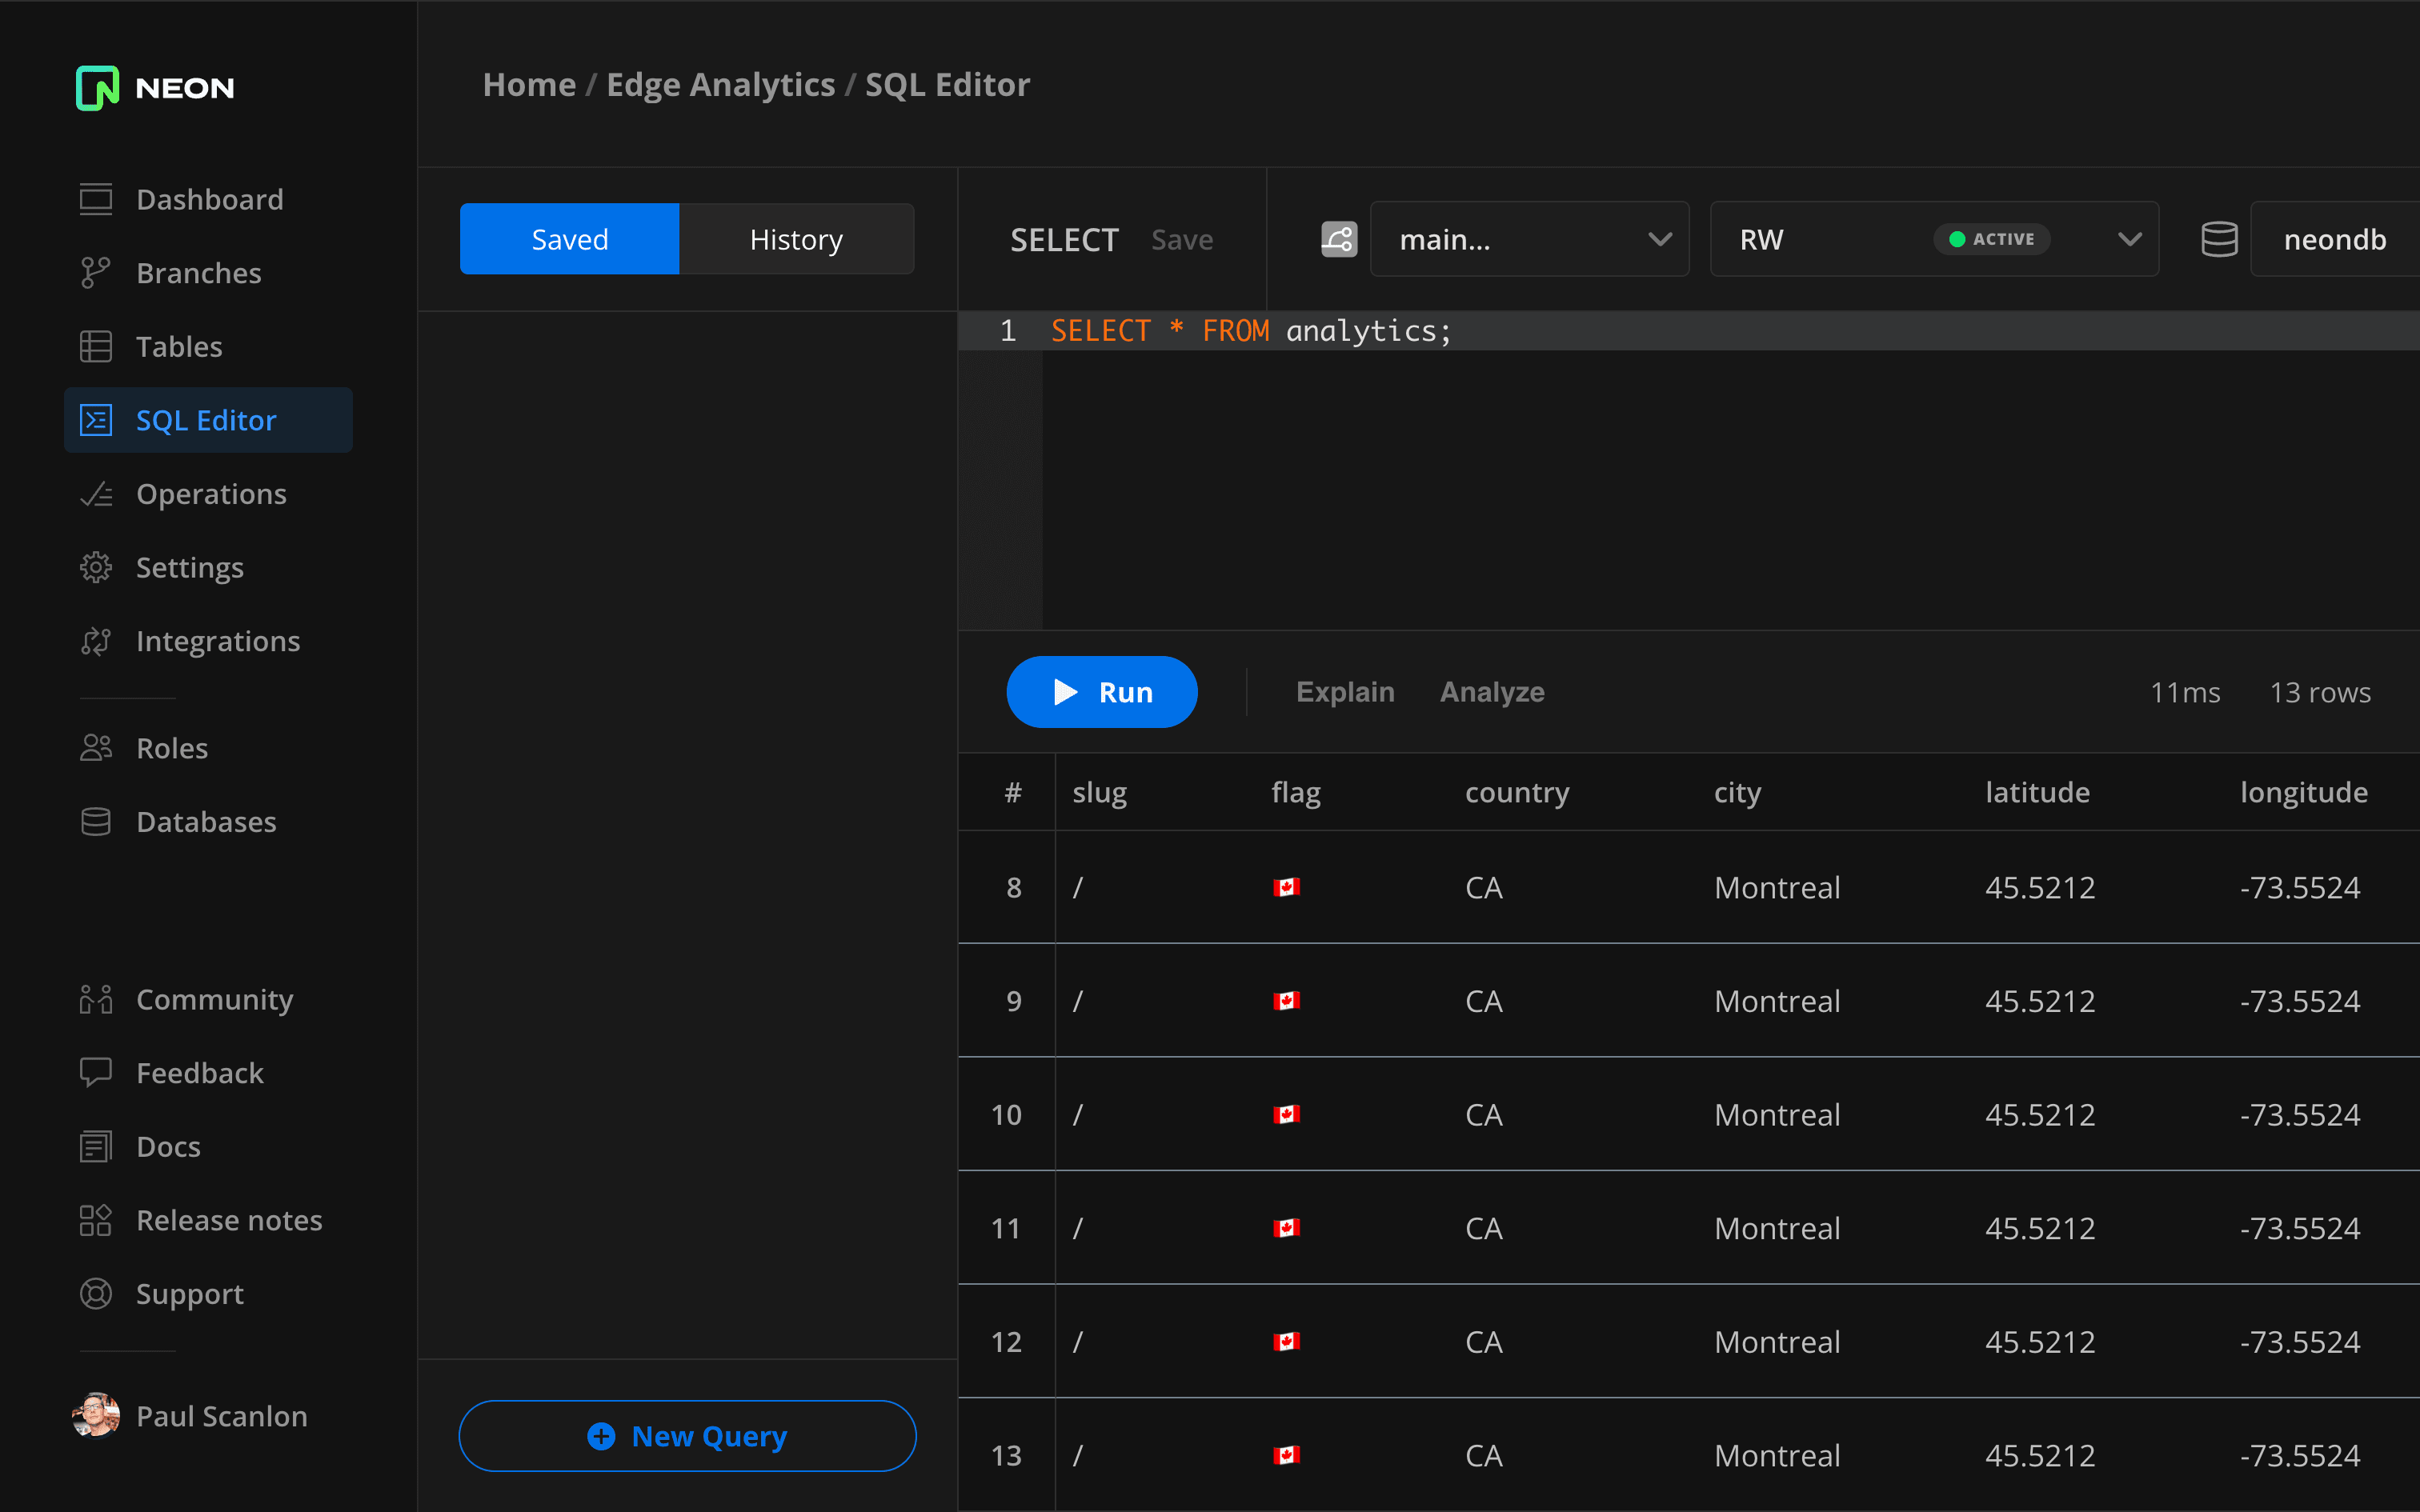
Once you’ve done that you can head back to the Neon console and run the following against the analytics table.
SELECT * FROM analytics;If everything is working correctly you should see some new rows of data in the table. Here’s what mine looks like. (I’m in Montreal, Canada FYI)
Data Visualisation Examples
Here are a few examples of what you could do with the data. I’ve implemented some of these on my dashboard, but I’d be interested to see how you’re using this approach.
Feel free to find me on Twitter/X and let me know: @PaulieScanlon.
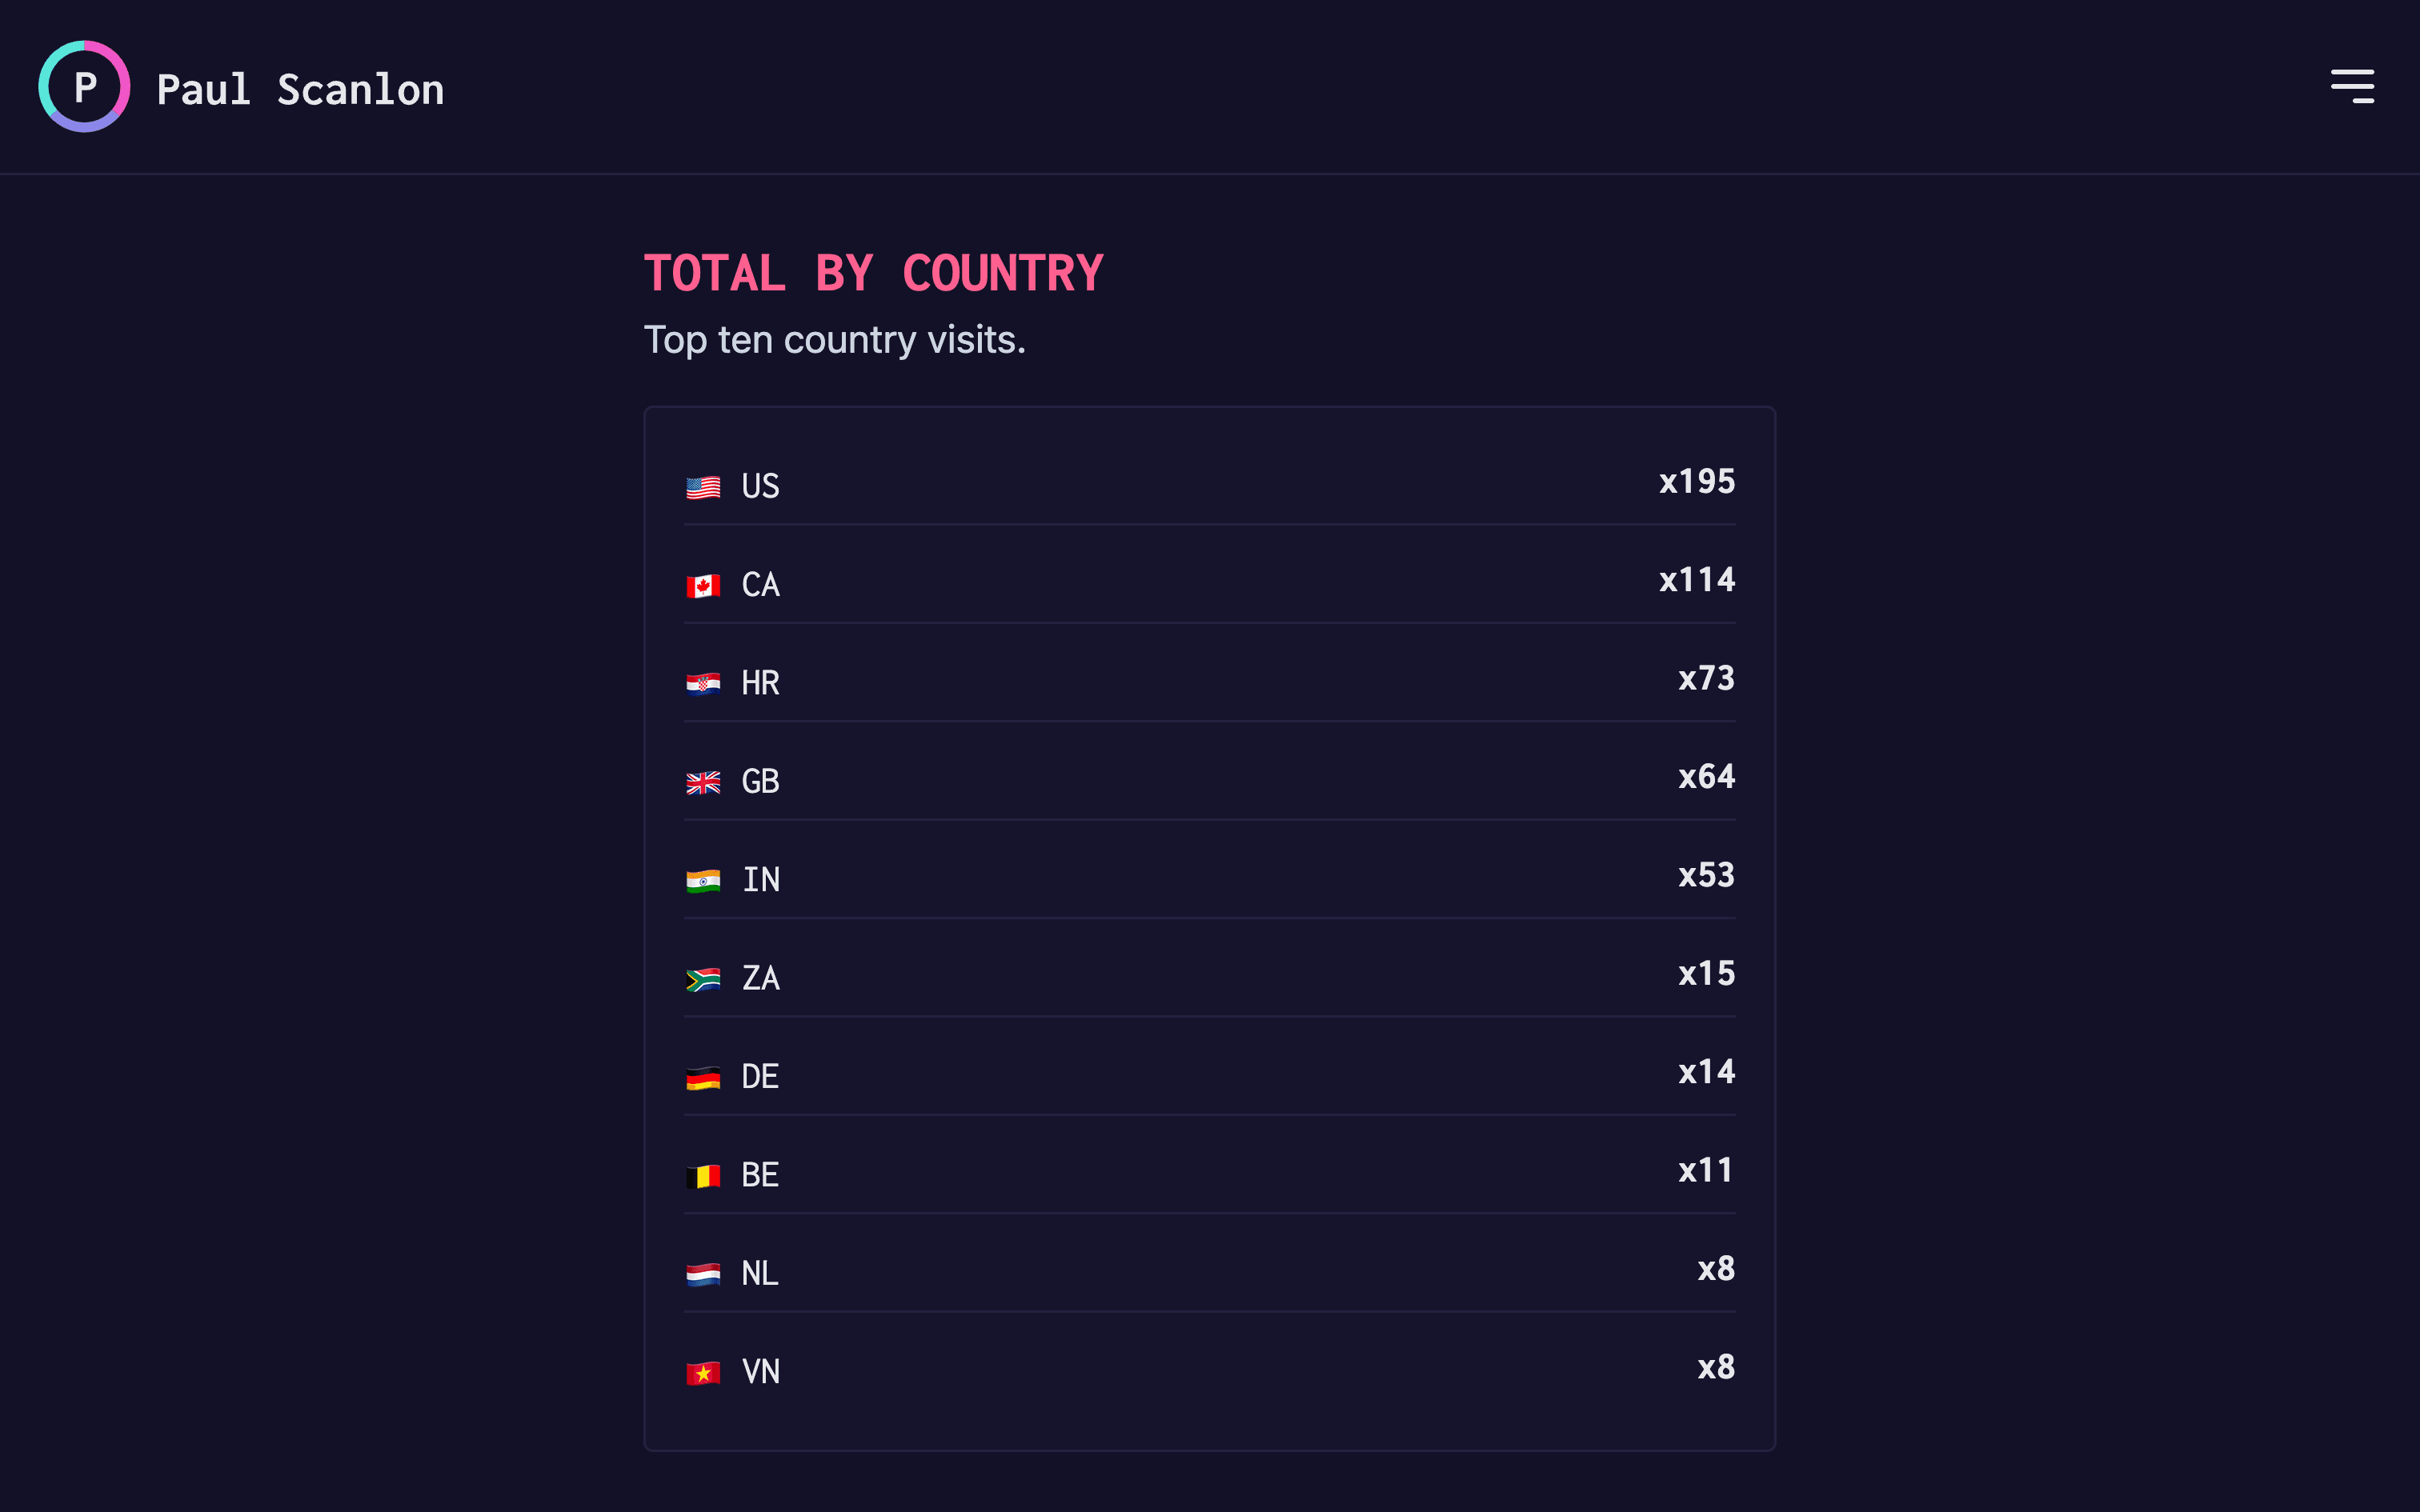
Top Ten Countries
In this example, I’ve created a query that counts the occurrences of the country name and limits the response to 10.
SELECT flag, country, COUNT(country) AS total
FROM analytics
GROUP BY flag, country
ORDER BY total DESC
LIMIT 10;
I’m displaying the results in a simple HTML list.
Top Ten Cities
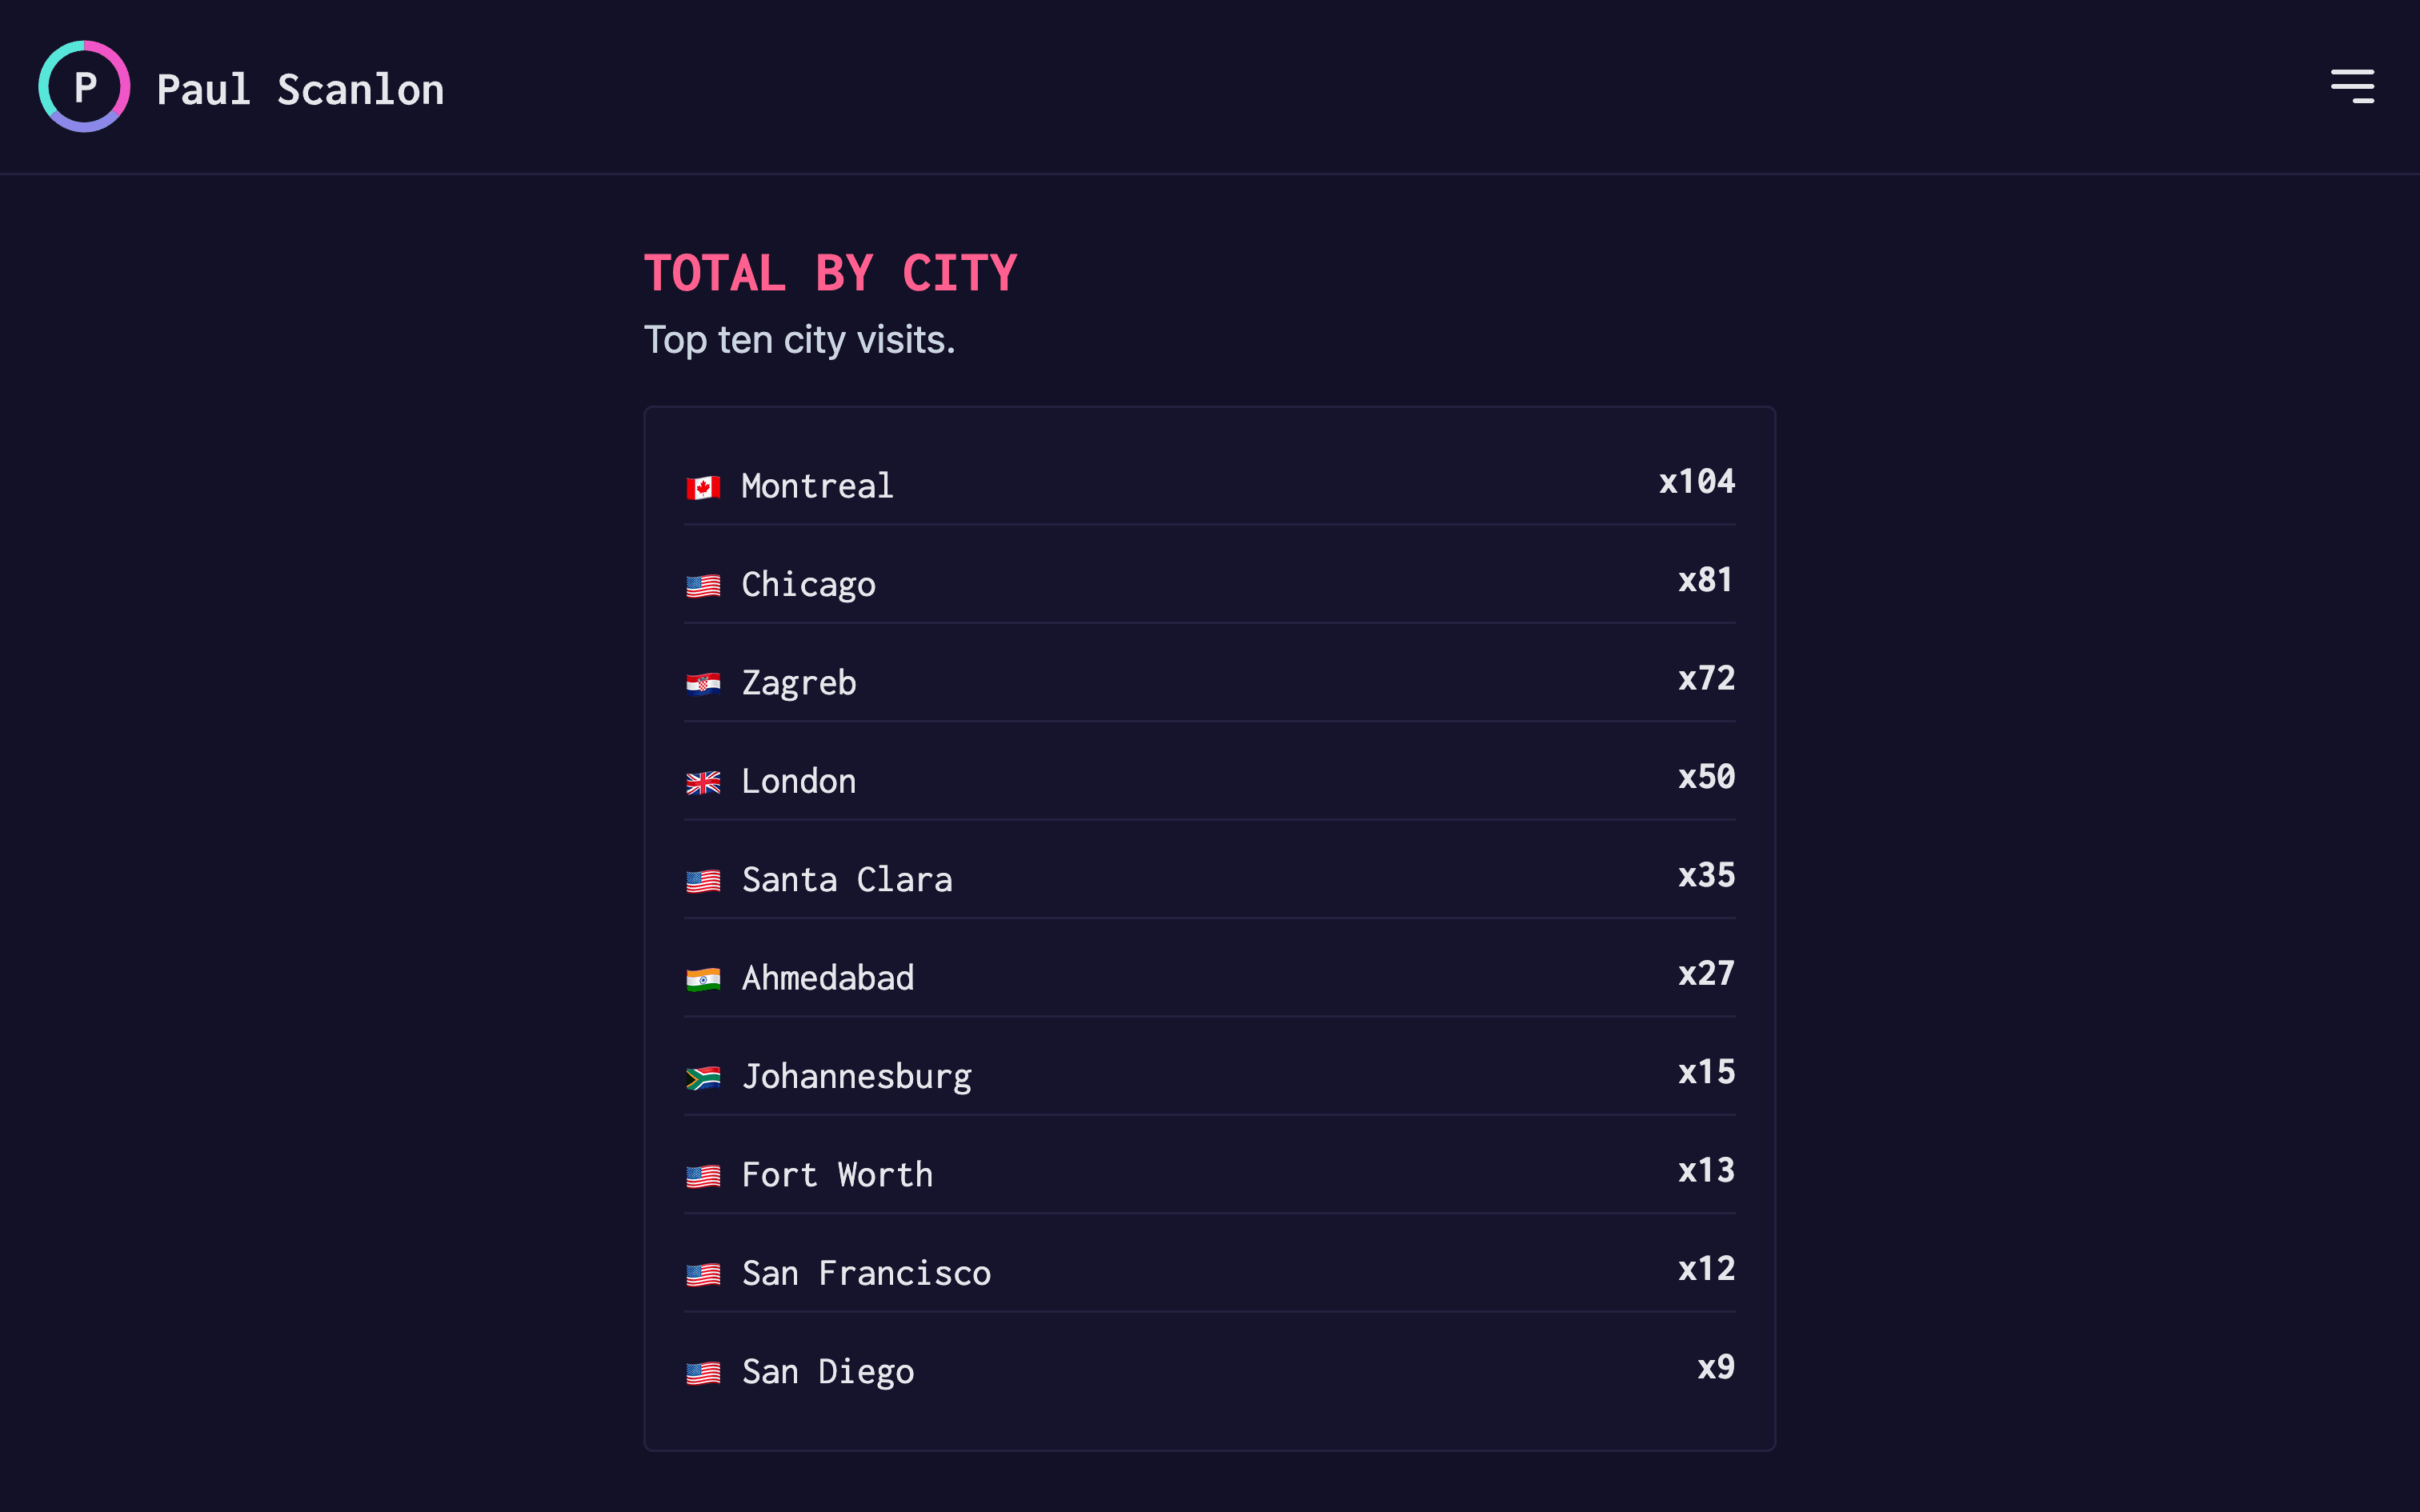
In this example, I’ve created a query that counts the occurrences of the city name and limits the response to 10.
SELECT flag, city, COUNT(city) AS total
FROM analytics
GROUP BY flag, city
ORDER BY total DESC
LIMIT 10;
As before, I’m displaying the results in a simple HTML list.
Geolocation
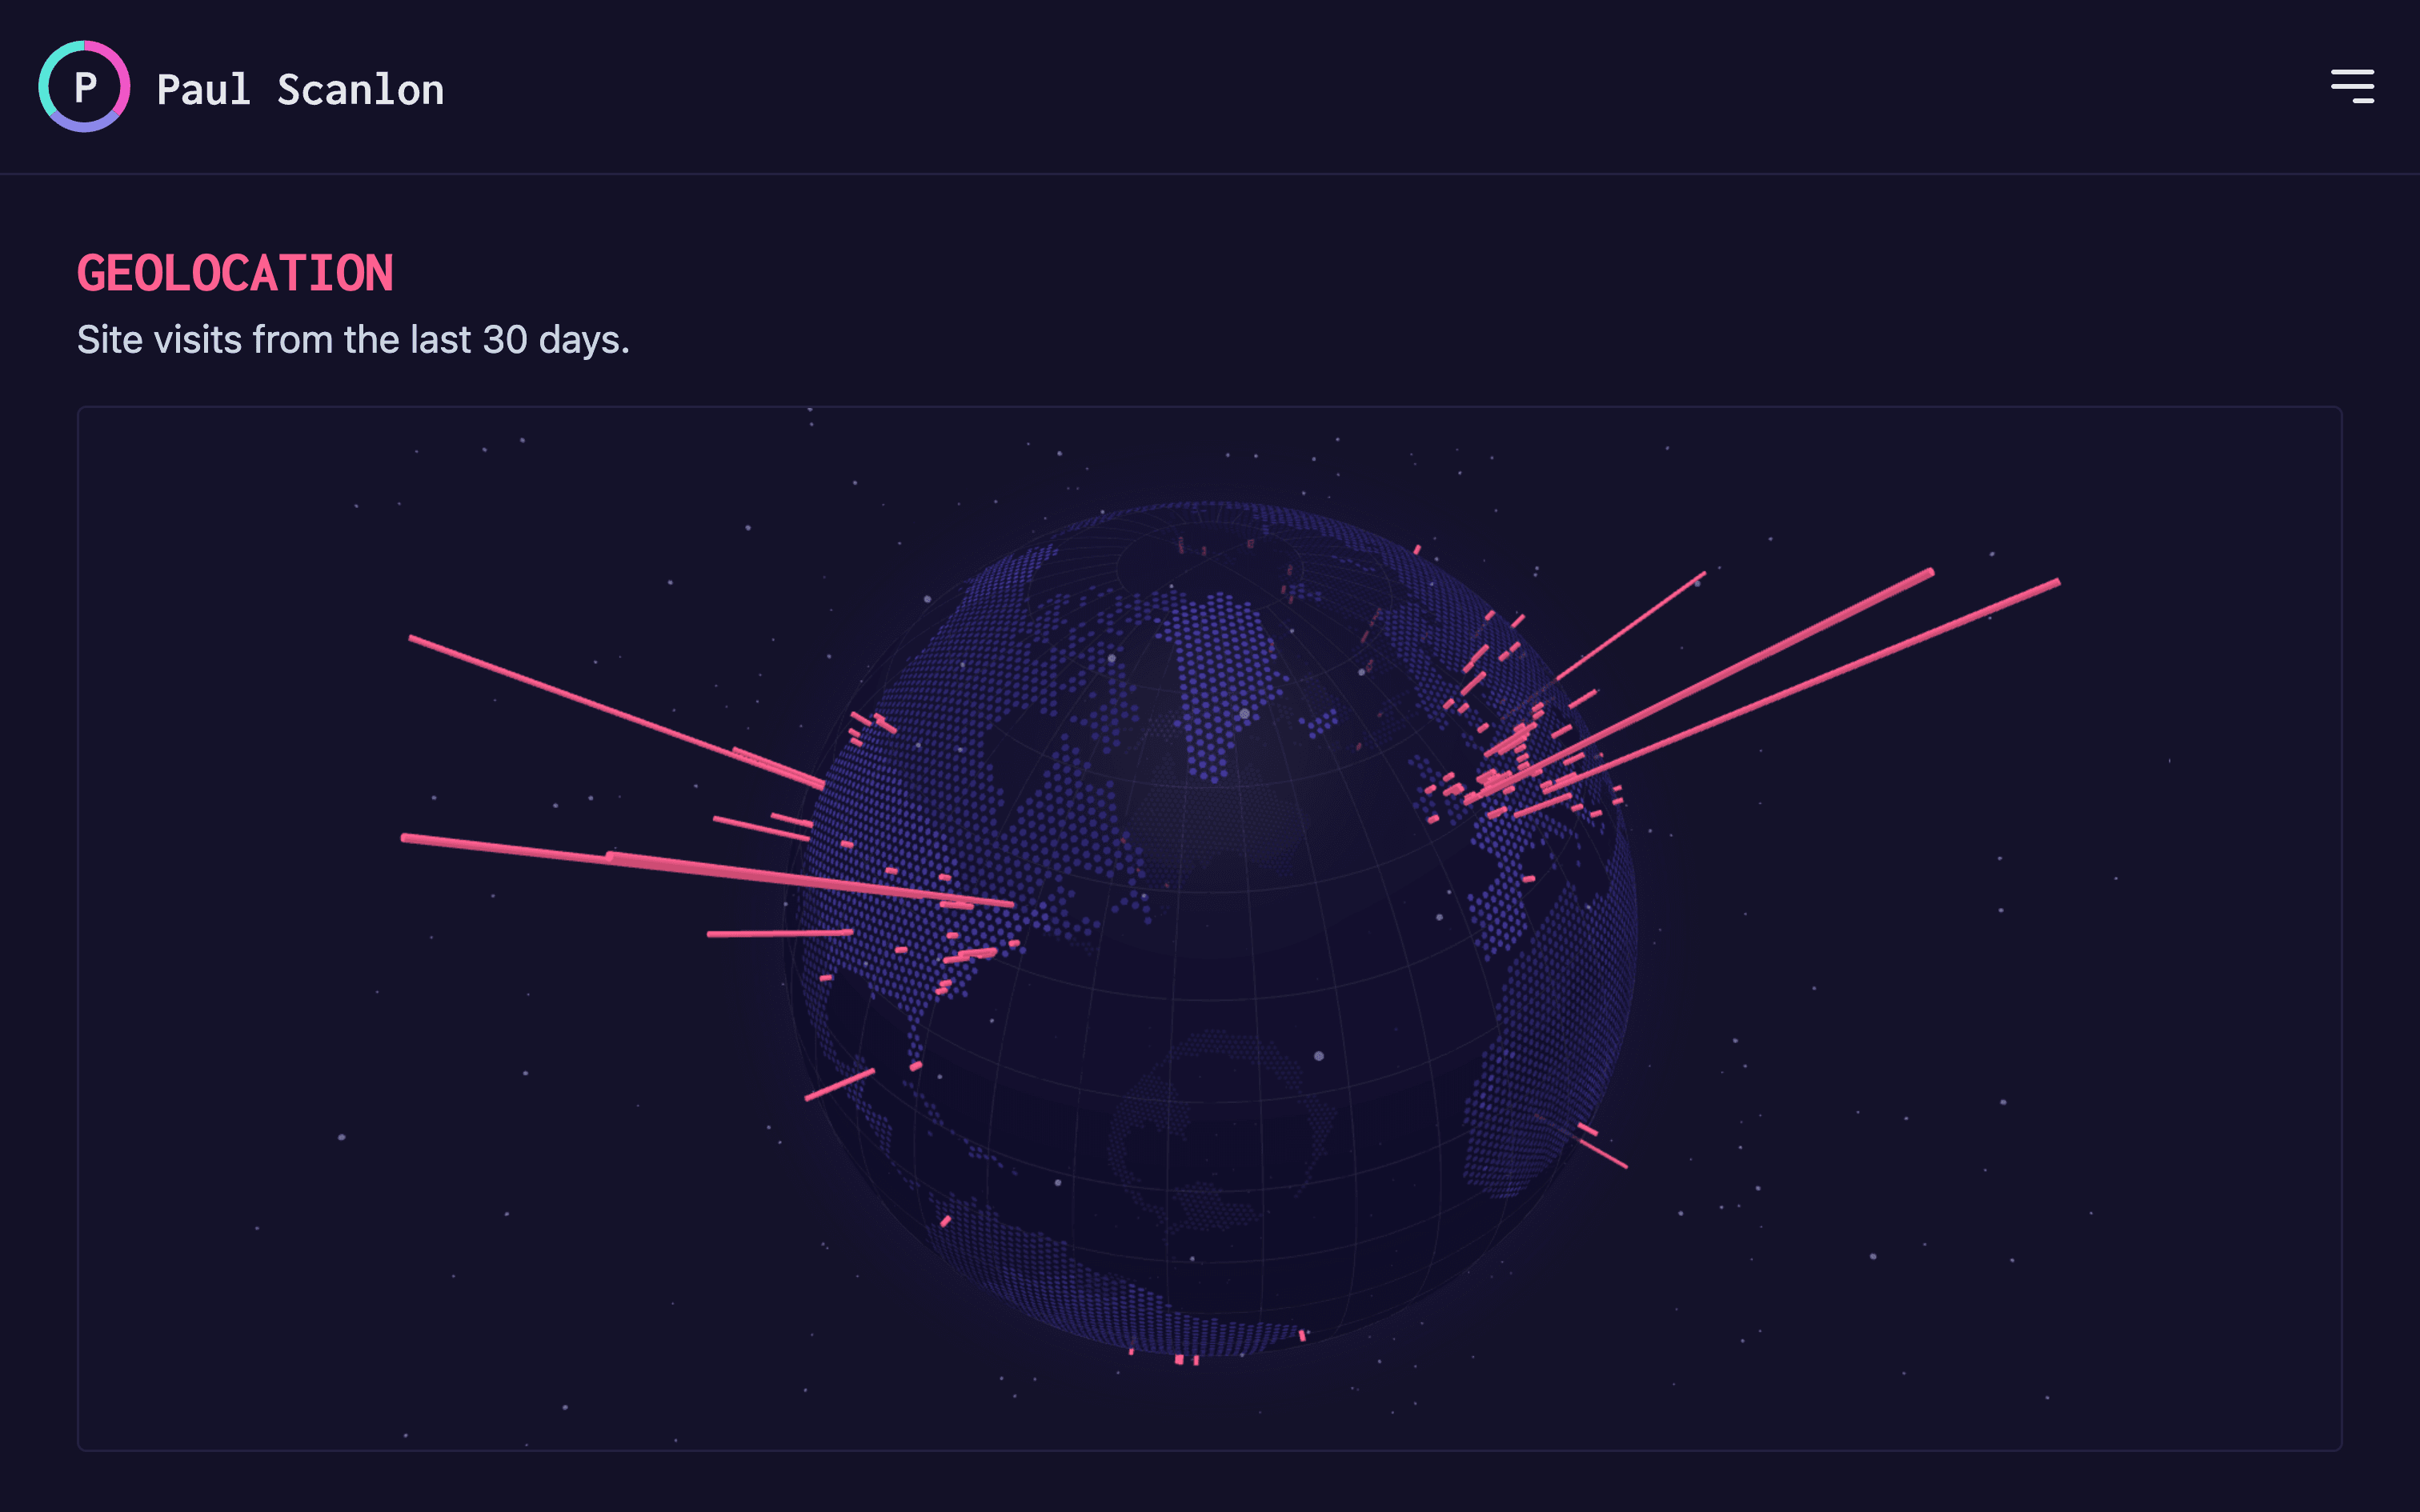
In this example, I’ve created a query that counts the occurrences of the city name for site visits in the last 30 days.
SELECT latitude, longitude, COUNT(city) AS total
FROM analytics
WHERE date >= NOW() - INTERVAL '30 days'
GROUP BY latitude, longitude
ORDER BY total DESC;
I’m using the results here to plot the latitude and longitude around a 3D globe and use the total as an altitude for each point. (The taller the point, the more visits from that city).
All Site Visits
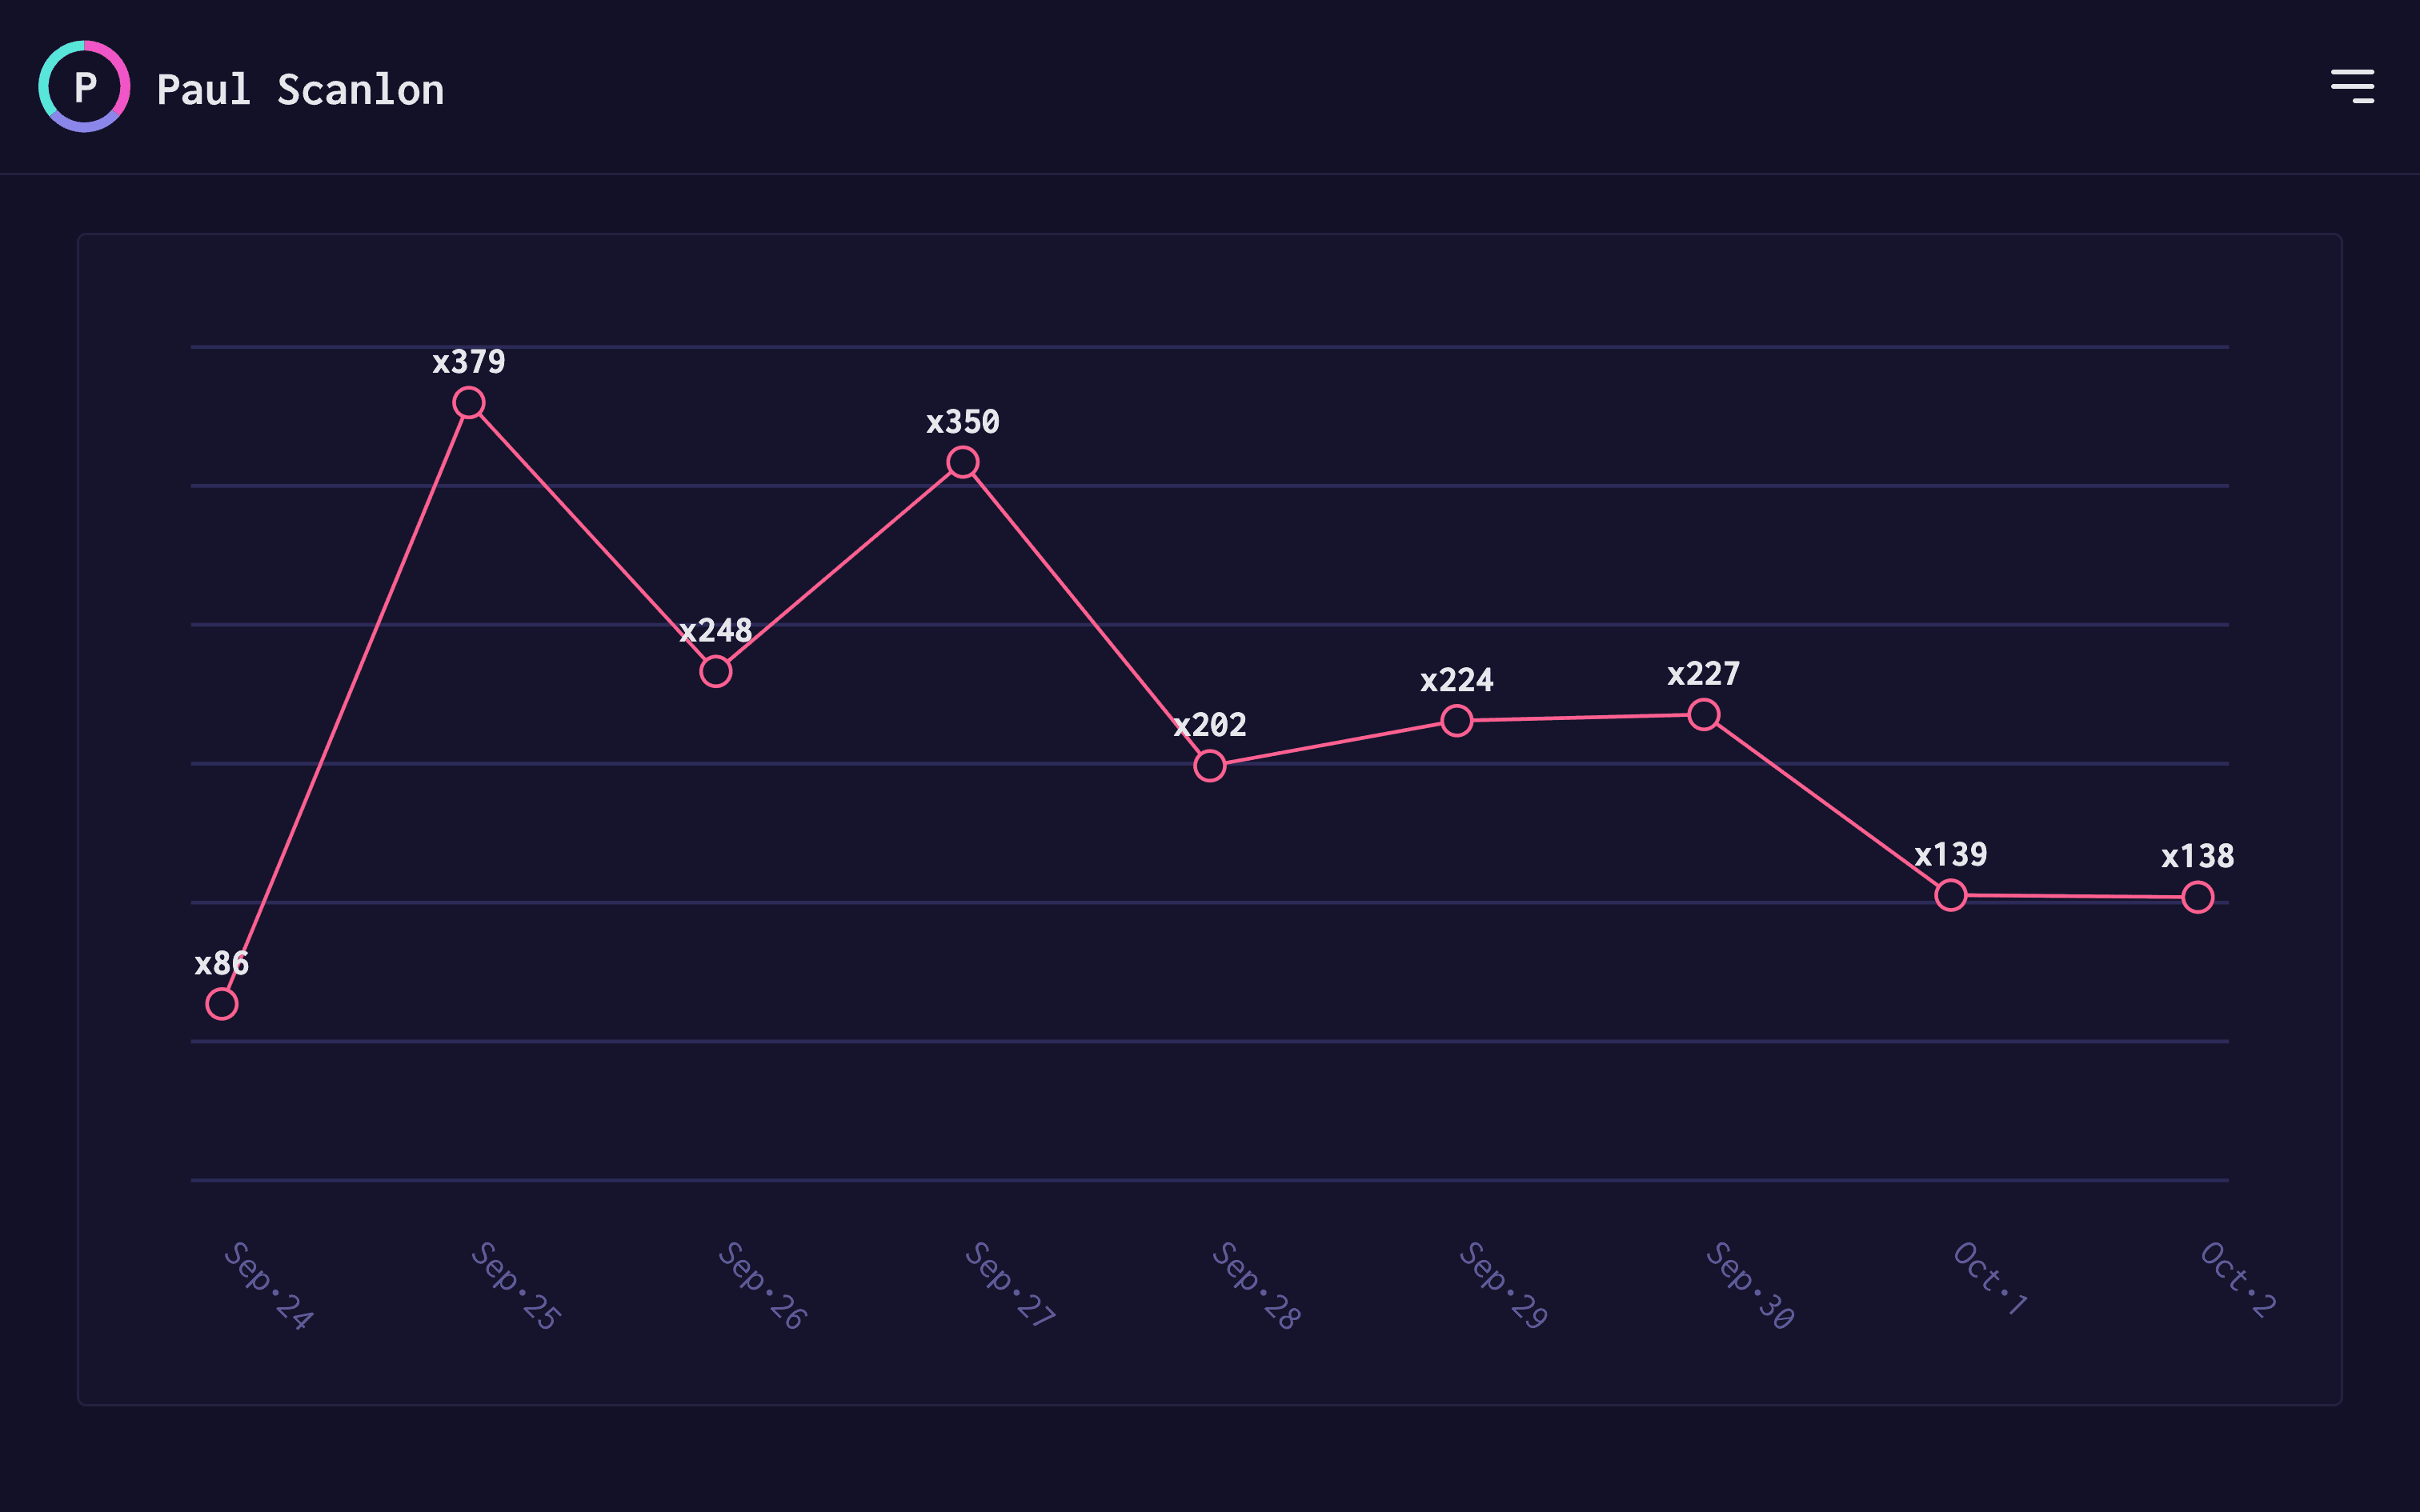
In this example, I’ve created a query that counts the occurrences of the day for site visits in the last 30 days.
SELECT
   EXTRACT(day FROM date) AS day,
   EXTRACT(month FROM date) AS month,
   EXTRACT(year FROM date) AS year,
   COUNT(*) AS total
FROM analytics
WHERE date >= (CURRENT_DATE - INTERVAL '30 days')
GROUP BY EXTRACT(day FROM date), EXTRACT(month FROM date), EXTRACT(year FROM date)
ORDER BY year ASC, month ASC, day ASC;
I’m using the result here to plot an Svg polyline chart to compare total visits over days of the month.
Finishing up
No doubt there are many other ways to represent this data and I might add more features to my site in due course but, for now at least, I’m happy with the way I’m capturing site visits.
Moreover, should Google remove any further reporting dimensions from GA4, I won’t need to change anything!
This data is mine and is securely and reliably stored in a Neon database, ready to be queried however I please, forever more.
If you want to try this out yourself sign up at neon.tech.
Thanks for reading.
TTFN.


